So on New Years eve we got this process started. Rodger, Jason, Josh and I got all our ducks in a row, got the water kettle set up and a fire built to heat scalding water. Yes we scald our hog, we do not skin them, I personally think it makes for much better cured meat. I do know it looks much better. We use the same kettle that is used for water to pluck chickens. The water should be hot enough to not let you dip you finger in the second time, almost a rolling boil to which you can add a small amount of Dawn dish detergent. The dawn helps break down any oil on the animals skin and hair to make scraping easier. Once the water is at the right temperature it time to do the deed. And yes we use a .22 rifle and always use a .22 short not a .22 long rifle. The .22 short will penetrate the skull and make a clean kill without going in far enough to damage the shoulder meat farther back.

As soon as the kill is made the animal needs to be "stuck", which means the throat needs to be cut to allow thorough bleeding. The cut should be made as soon as the animal hits the ground as it is best not to wait till the kicking stops. The placement of the cut is essential too as it needs to be made about 2 to 3 inches behind the jowls or rounded part of the jaw and near the throat. This will severe the jugular veins and get a good bleed. Then the animal is allowed to bleed out and stop the kicking or death throws as some choose to call it. After this the animal needs to be moved by what ever means you have available to the area where you are going to do the cleaning and butchering. We used a large piece of rubber roofing to drag the animal to where we could get to her with a tractor and boom pole. Then with a very sharp knife you need to make a slit in the skin on the back of the rear legs down near the foot. What you are looking for is actually the ham sting, a very tough ligament that you should pull the hooks of the gambrel underneath. We have and use a single tree that is made to use with a team of mules or horses to pull a plow. The ham stings will support the weight of the animal. A gambrel used to hang deer will work fine, just make sure to check the weight limits. At this point the hog is hoisted up with the boom on the tractor and taken to the scalding area. She was laid on 2 wooden pallets that had been covered with the piece of rubber roofing that was used to drag her to the tractor. Now the scalding and scraping began. The kettle we used is about 30 gallon, but ideally you need a 55 gallon metal drum laid on its side with a opening cut so you can dip the hot water to use. The water heats quicker and you will have more than enough to clean the animal. So we started but pouring the scalding water on the head area and then cover it with old burlap feed sacks that were dipped in the hot water. This does help keep the heat in and make cleaning easier. After the water sets for a couple minutes you can check to see if the hair will come off, just pull and if it gives loose real easy its ready. For the scraping use a preferably large long bladed knife holding it by the handle and the tip and "scrap" the hair off the animal. You do not want to "shave" the hair off, it will leave part of the hair in the meat which you dont want. IF the water is hot enough this task should go fairly quick. The head and the feet are the hardest parts to clean and will require some soaking for a bit with the hot water and burlap treatment.You use this method to get all the hair off the animal and no matter what color hog you start out with it will end up white. This hog being somewhat small there was not enough meat on the head to warrant worrying with it and getting it really clean.But we did clean the jowl really well as it does make some of the best bacon. The same with the feet. I'm not lazy but it was gonna be far more work than it was worth. After the scraping is done this is what you will have left, one clean white pig.

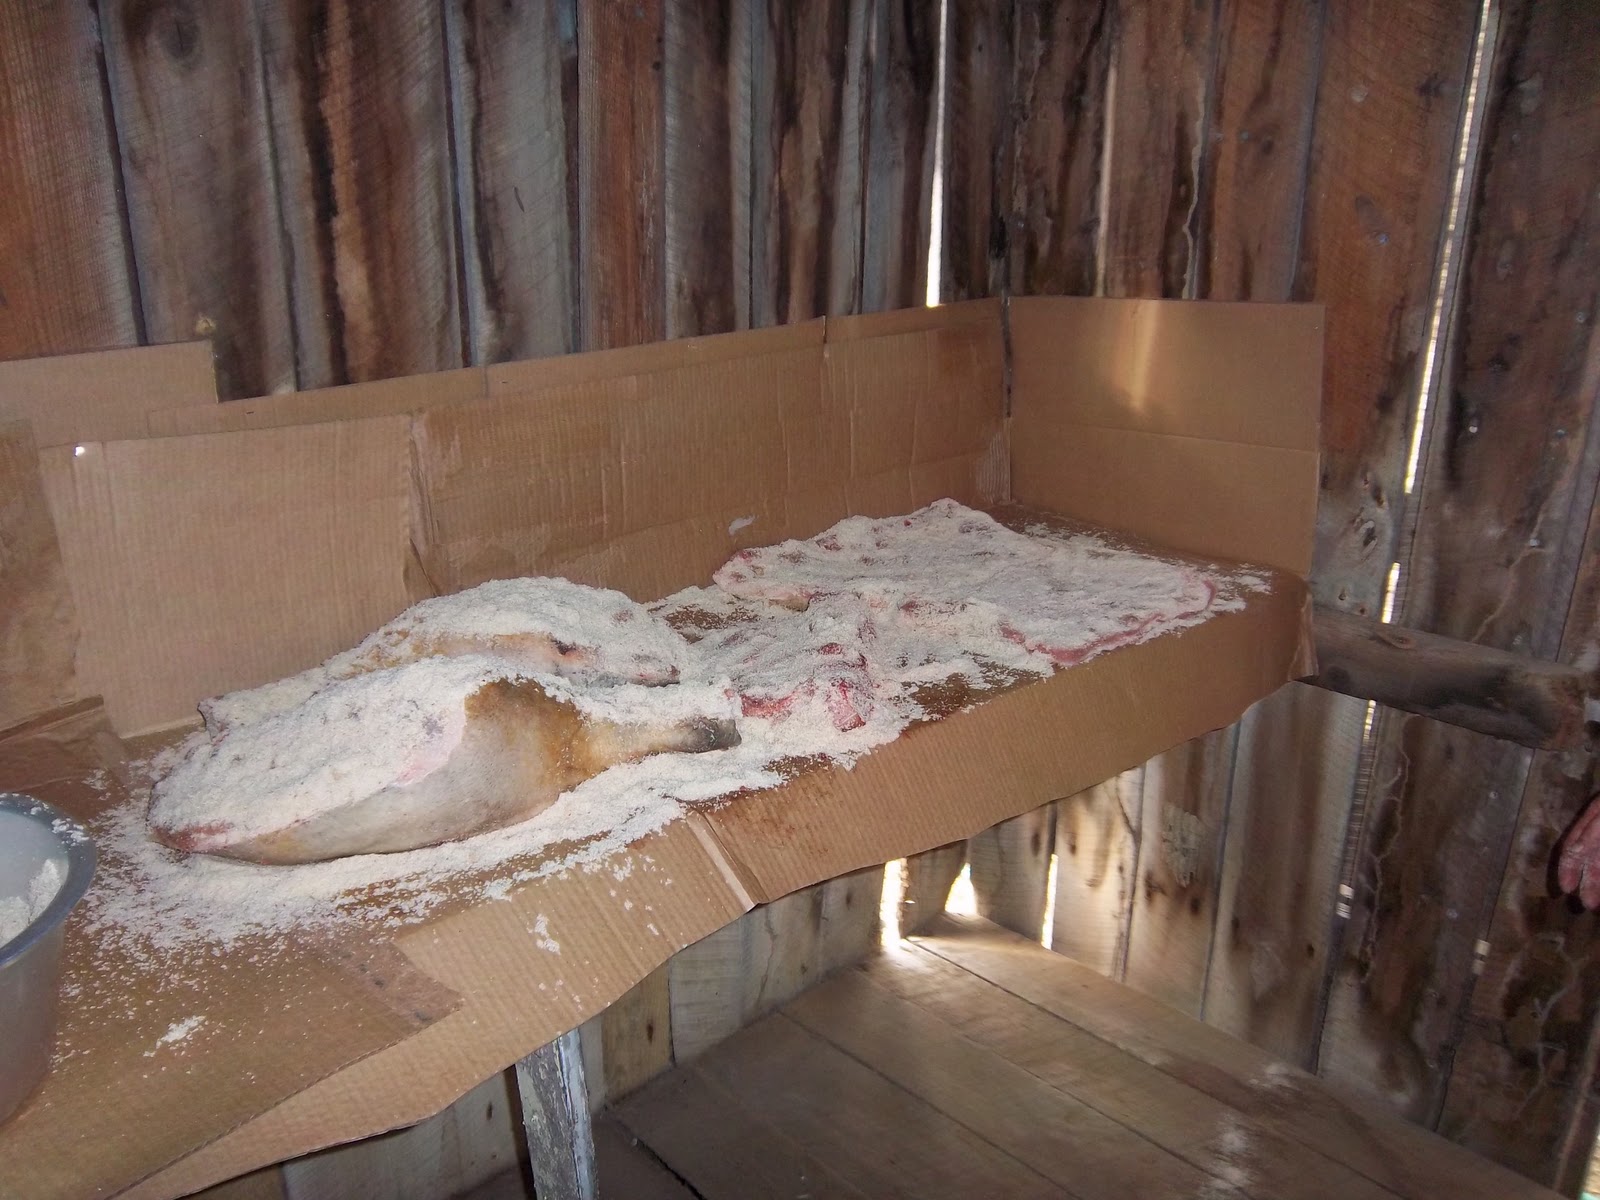
This photo kinda gives you an idea of the setup. Water tank nearby, pallets below covered with rubber roofing material and one cleaned hog. After the animal is cleaned it is best to re-hang it from the tractor boom for the gutting process. It does make it easier. Now for that process I will do the best I can to give you details. The first task it to take off the head. A long bladed butcher knife is the best tool for this. You will start at the throat hopefully near the stab wound and again about 3 inches behind the rounded jowls and make a straight a cut as possible all the way thru to the spine. You will go thru the jugulars and esophagus and when you reach the spine you will need the meat saw to cut thru the bone. We have the old fashioned meat saws but Josh had brought his battery powered reciprocating saw that made quick work of cutting thru the spine. So now with the head removed it can be hung up to drain and taken care of later. To hang the head, we usually use a hay hook to hook thru the septum, which is very tough and then hang it up on the side of the meat house till we get ready to take care of it a lil later. Now on the the gutting part. Your first cuts should be made to get the rectum and genitals in our case, cause it was a female, loosened up. Use a pair of pliers or better yet vise grips to get a grip on the edge of the rectum and then with a very sharp knife cut around the rectum and genitals till they can be pulled out a lil bit and tied with string to prevent any bowl contents from contaminating the meat. Then proceed to cut around the colon as far down as you can see and then keep seeing and cut more. This is the point when you do NOT want to cut into the colon or intestines of any sort. Then you go the the front of the hog and start making your cut from one end to the other for gutting. Take a sharp knife and make a "mark" from the center of the genitals to the neck. Then start at the neck end which if it is hanging up will be the bottom and cut into the neck till you hit bone keep working the cut upward till you come to the end of the breast bone. Once you have cut thru all layers of the animal to the breast bone, you will again need a saw to cut thru the breast bone. Don't worry, the guts will not fall out. At this point they are being held in by the diaphragm. Now with the breast bone cut you will be able to see the heart, and lungs. Now go back to the top or rear of the animal and make a cut from the genital to the breast bone just thru the skin, then on the second pass down you will cut thru a thin layer of fat, now to the tricky part. Once you are thru the skin and fat you will see and feel a thin membrane. At this point this is all that is holding the guts in. Open up the membrane near the genitals and down about 8 or 10 inches. Now what you will see is the hind quarters and the atch bone that connects the hips together. This will need to be cut as close to the center as possible. I think the best tool for this is a small hatchet and a hammer. Lay the hatchet blade on the atch bone and hammer it thru till you know you are thru the bone. Be careful not to hammer too far in and puncture the colon which lies between that atch bone and the spine. Then carefully using a knife while someone else pulls upward on the tied off colon cut the colon free and once it is free pull it forward toward the animals belly. So far you should have successfully got the stinky parts free and you are for the most part out of danger of cutting a gut. Now go to the cut you made up the belly where it is still intact and put 2 fingers on the inside to hold the intestines back a lil and using a knife or knife with a gutting hook go ahead and open up the whole belly by cutting the membrane. The intestines will come out into a large container that you have hopefully placed under neath the head prior to this. Once the intestines are out and you look inside the cavity you will see that they are still being held in by something. This is the diaphragm, and this will need to be cut loose. Once the diaphragm is cut loose all the way around you can use your hands to rake the lungs and all the other internal stuff out and pull out the windpipe or esophagus. Now the animal should be clean and all done inside. Unless you puncture an intestine or something there really is no need to have to rinse the inside of the animal out. Now you have a hog ready to cut up and process. The following is the method we use. We never were big on pork chops much preferring tenderloin. or back strap. So at this point you will need a good meat saw or in our case a battery powered saw to remove the spine. Go to the inside of the animal and you can plainly see the spine. You start the cut at the top or rear end of the hog and cut from top to bottom on both sides of the spine and no more than an inch away from it. Once this has been done from top to bottom lay the spine aside. This can now be cut into chunks of back bone for cooking or sawed into small pork chops. We usually end up with some of both. The ends of the back are left in chunks for cooking like a stew and the middle section is cut into chops. Now with this done, we lay the hog skin side down on the cleaning bench that has been hosed off and is very clean.

Then I cut each half of the hog into 3 sections. We call this blocking it out, the hams and shoulders will look kinda square. At this point they will need to be trimmed up and shaped to look like hams. The trimmings are set aside to later separate into lard and sausage meat.The feet were removed just below the knee prior to laying the hog back down. The hams are taken to the meat house where the get the cure placed on them and laid on the bench to drain. As for trimming the bacon or middling, when you look at them you will see the pretty white area at the top where you pulled the tenderloin from, this can be taken off and cut for lard or left on and cured for "fat back". I left one on and took one off on this hog. The middling should have a nice square shape to them. Then off to the meat house to be rubbed down with the cure.

The weather was perfect for butchering. Although when ya are working ya can get a little hot if you over dress like I did. Anyway, at this point you should have the hams, middling and shoulders trimmed and have the cure on them. Now you can take the jowl off the hogs head that you hung up to drain earlier. We normally hang the head by the snout which makes it easier to take the jowl off. Make a cut with a sharp knife from the corner of the mouth on each side to the neck area passing just below the ear where you have cut off the head. Now cut in deep till you hit bone and trim the jowl off the hog head trimming all the way to the bone from one side to the other. What you should end up with is a piece of meat that is kinda triangle shaped and is thin near the lower lip and thick near the neck area. This is rubbed down with the cure as well. I personally think this jowl bacon has the best flavor of any bacon. Now if you like liver you go back to the tub containing the intestines and retrieve the liver and heart, and what ever other parts you prefer out of there and then dispose of the intestines. We use em for coyote bait. We don't eat liver here or the heart so it was put in the scalding kettle with a lil water and cooked along with the lungs for Luna. I did not get to make pickled pigs feet as we didn't get the feet cleaned well enough. We actually didn't have enough scalding water.And in the middle of scraping a hog you don't want to let it lay and wait for water to heat. And with the hog being small it was not worth the work to make souse meat either, just not enough meat on the head. So I didn't get to do either of those. I was so looking forward to some souse meat too dang it. But in a later post I will tell you how and give you the recipe for souse meat that I use as well as the one for pickled pigs feet.
Now with all the outside work done you are ready to take the meat that has been trimmed off and separate the lard from the sausage meat and make your sausage and cut the lard for rendering. As this has been a rather long post I will do the next post on sausage making and rendering lard.
Stella
1 comment:
I love these posts! I know it's hard to explain how to do something. It sounds harder than what it actually is. How do you do the bacon and hams. Do you hang them in a smoke house? Use a smoker?
Post a Comment